In this guide, you’ll learn the exact strategy I’m using to capture 80,46% of my subscriber’s email addresses in Facebook Messenger with ManyChat.
It’s easy to set up and it only requires one click from your subscriber to join your email list.
Let’s dive in!
- Creating the email capture flow
- Adding contact to your Email Service Provider
- Delivering your lead magnet
I’ll first show you how to set it up in ManyChat and then how you can add someone to your Email Service Provider & deliver your lead magnet after they give their email address.
Bonus: click here to get the flow I’m using to capture 80,46% of my subscriber’s email addresses.
Creating the email capture flow
Ok, this is the fun part.
We’re now going to ask for someone’s email address in exchange for a lead magnet.
The conversation in Messenger will look like this:
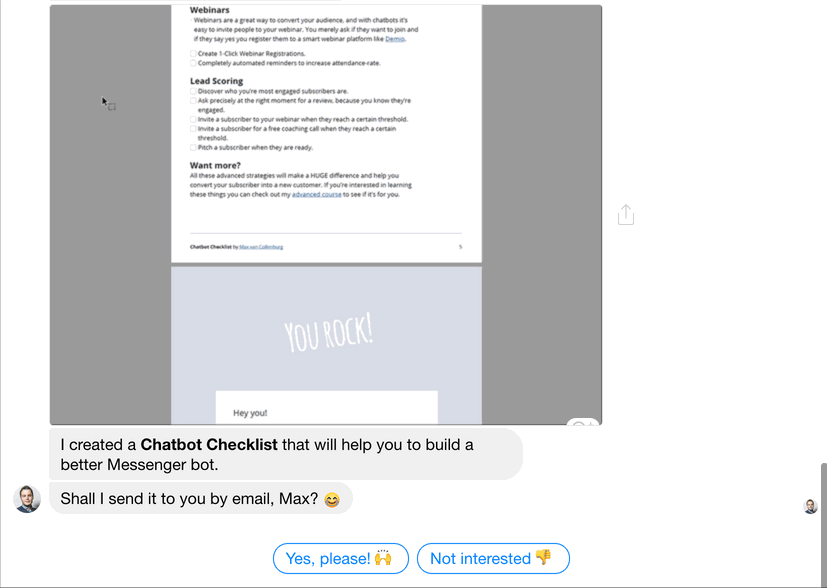
As you see the subscriber only has to click one quick reply to give their email address.
(The email address that will be shown is the email that they signed up with for Facebook)
To achieve this we have to create a little flow inside ManyChat.
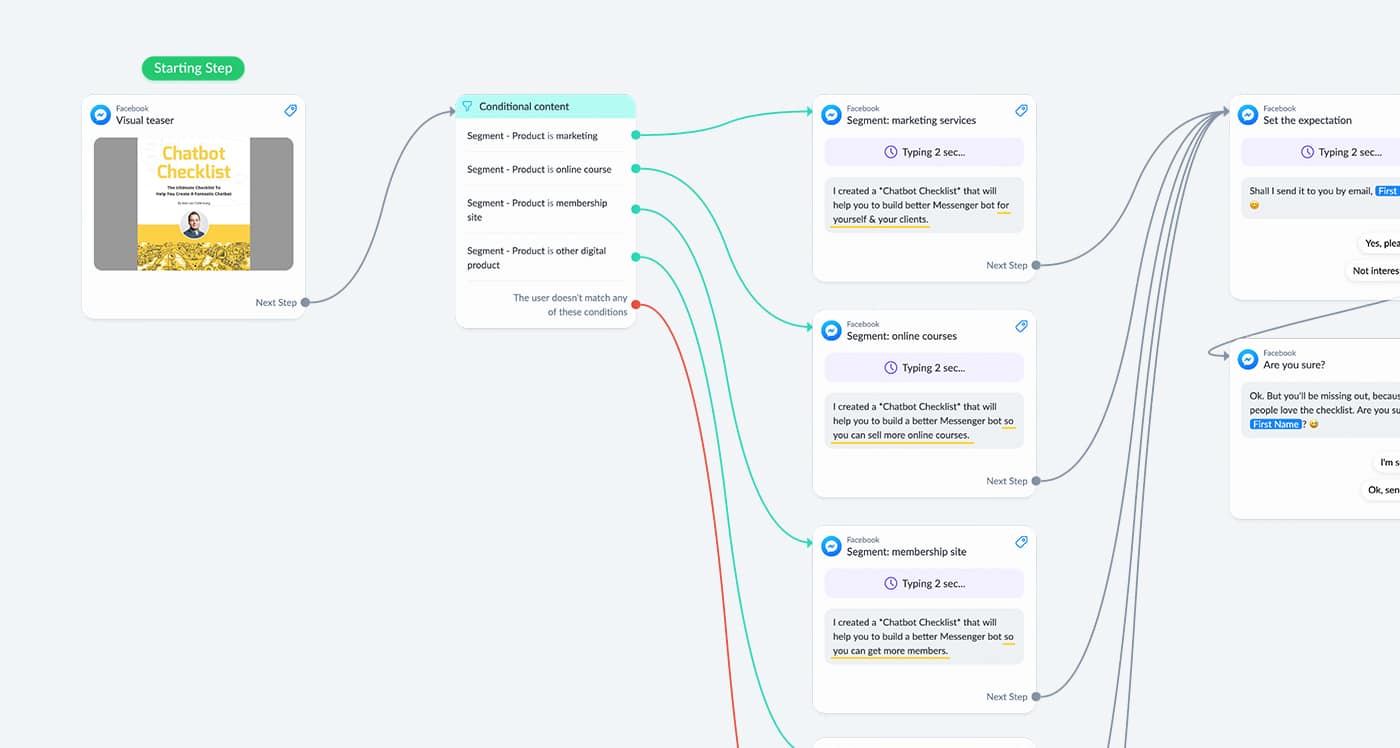
Here’s a zoomed-out view of the flow we’re going to build:

It works like this:
- Show a visual teaser of the lead magnet we’re giving away.
- Describe why it would be useful for them.
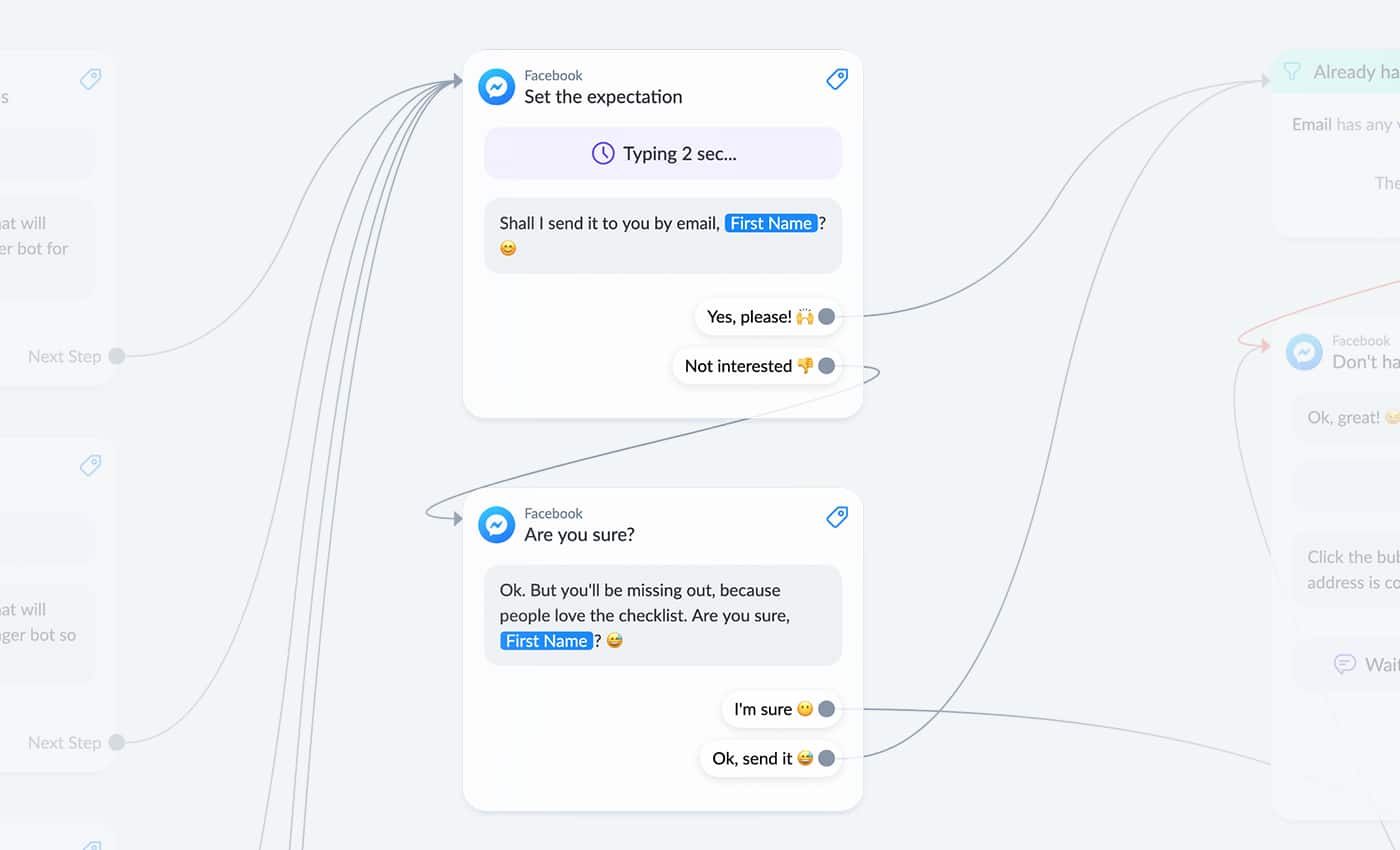
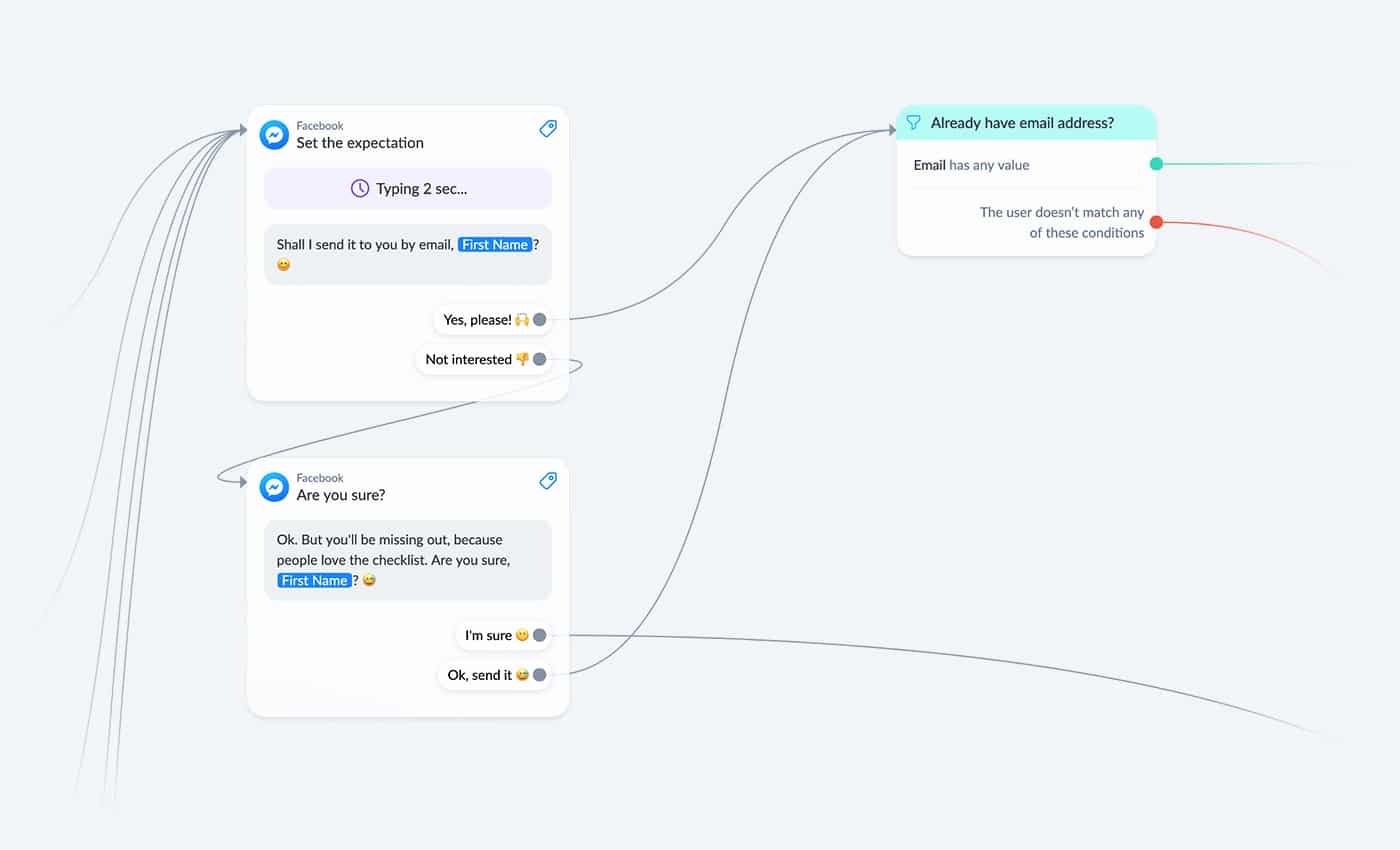
- Set the expectation you’re going to ask for an email address.
- Ask for the email address.
- Tell them to check their spam folder if they can’t find it.
Let me explain you each step.
I like to tease people a bit with what they’re about to get.
That’s why I show a little GIF of the ebook I’m giving away.
You can insert GIFs by inserting an image block.
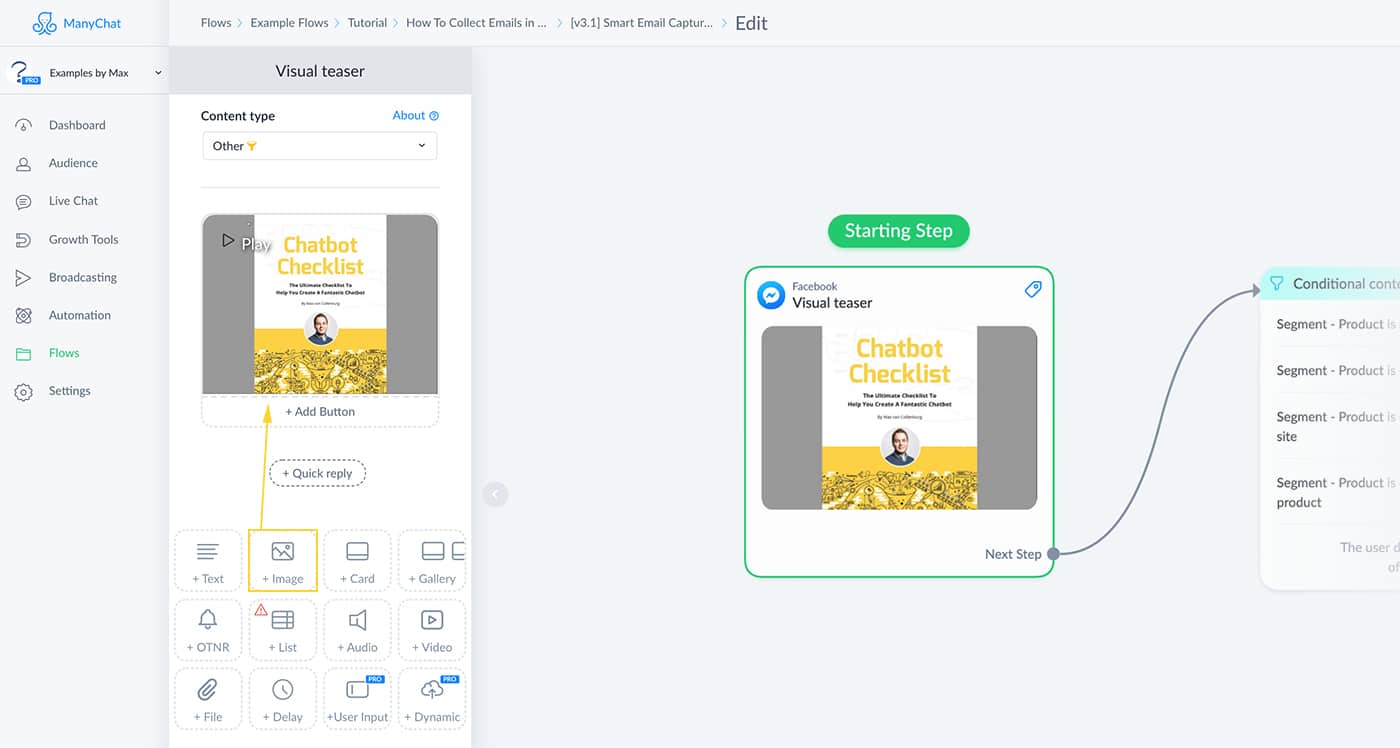
Directly after that, we tell the subscriber what it is and how it will help them.
I’m using conditional content to show different messages to different people, which makes it more relevant to them.
Then, we set the expectation that we’re going to ask for an email address.
This is an important step most Messenger bot builders don’t think about.
It’s good for two reasons;
1) We’re still giving people a way out. Otherwise, they’ll be stuck in the email capture part.
2) When the subscribers click yes, they do a micro-commitment because they tell themselves that they want it which makes it much more likely they’ll actually give their email address.
This is just a simple yes or no question where we ask if it’s okay if we send the lead magnet by email.
After someone clicks ‘yes’ we quickly check with a condition if we by any chance don’t have the email address already.
(would be silly to ask for it again, right?)
If you already captured the subscriber’s email address you can just send the download over to them, which you’ll learn how to do in the next step.
But if they didn’t give their email address yet, we have to ask for it first and store it into the email system field.
You create a user input field, set the Reply Type to ‘Email’ and save the response to the email system field.
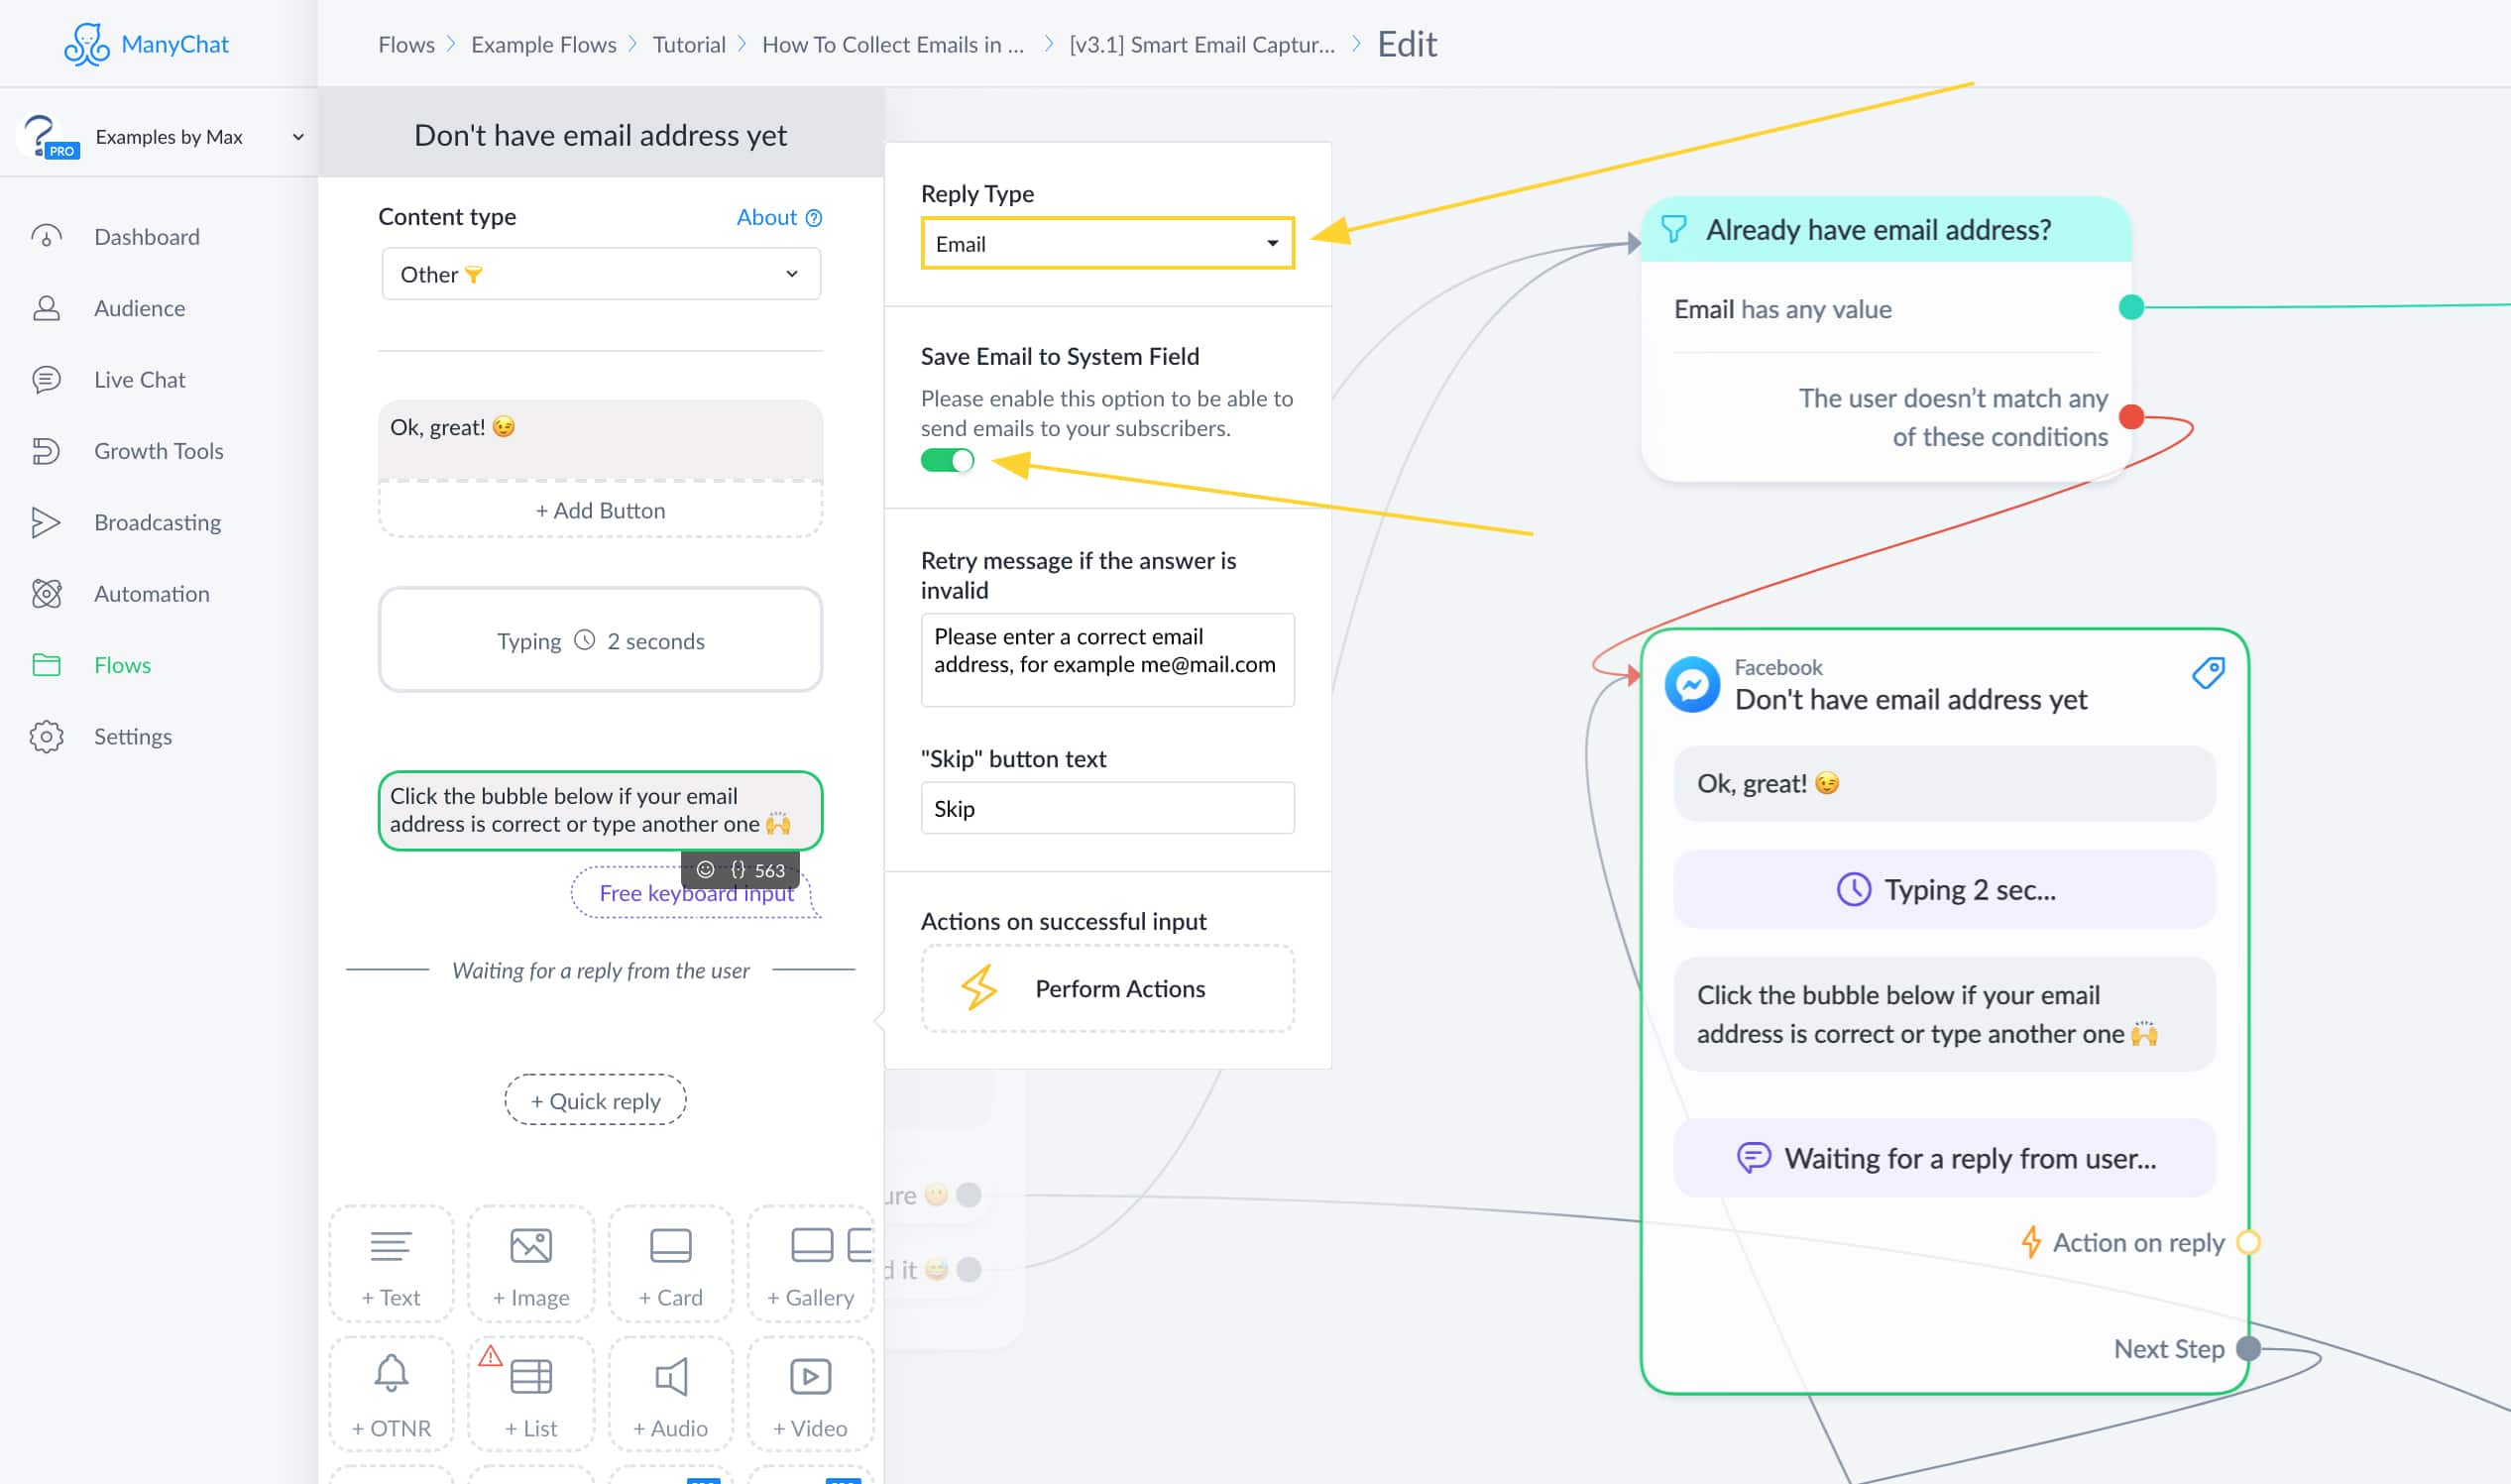
And as you can see in the screenshot above, we also left the “Skip” button.
This way, subscribers don’t get stuck if they don’t want to give their email address after all.
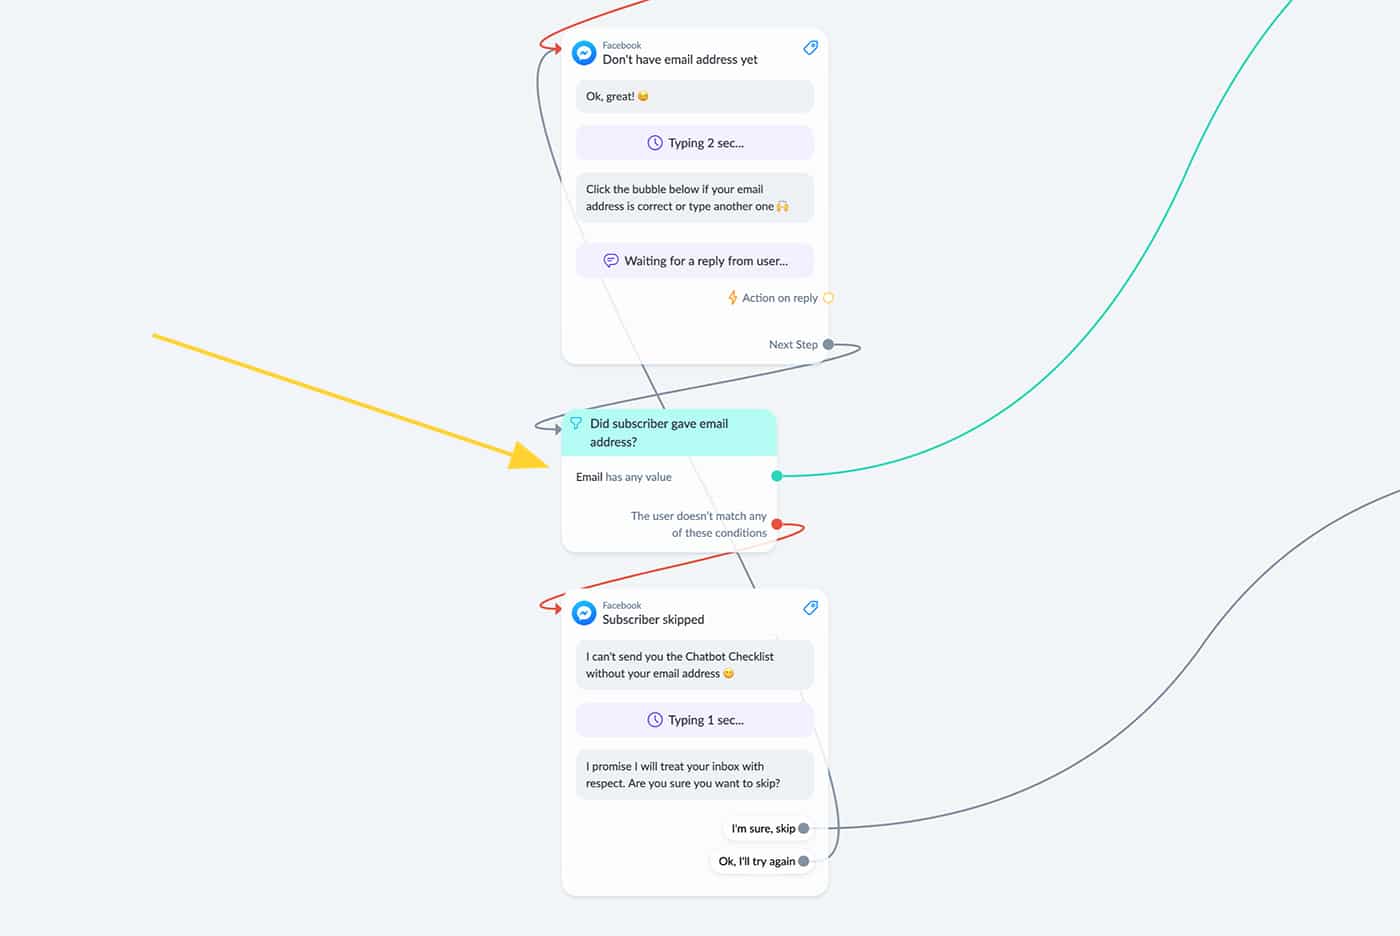
But because of that, it’s important that you check if the email system field has any value.
And if it doesn’t have any value, we explain that we can’t send the checklist without their email address.
(you’ll be surprised how many people will still give their email address after that)
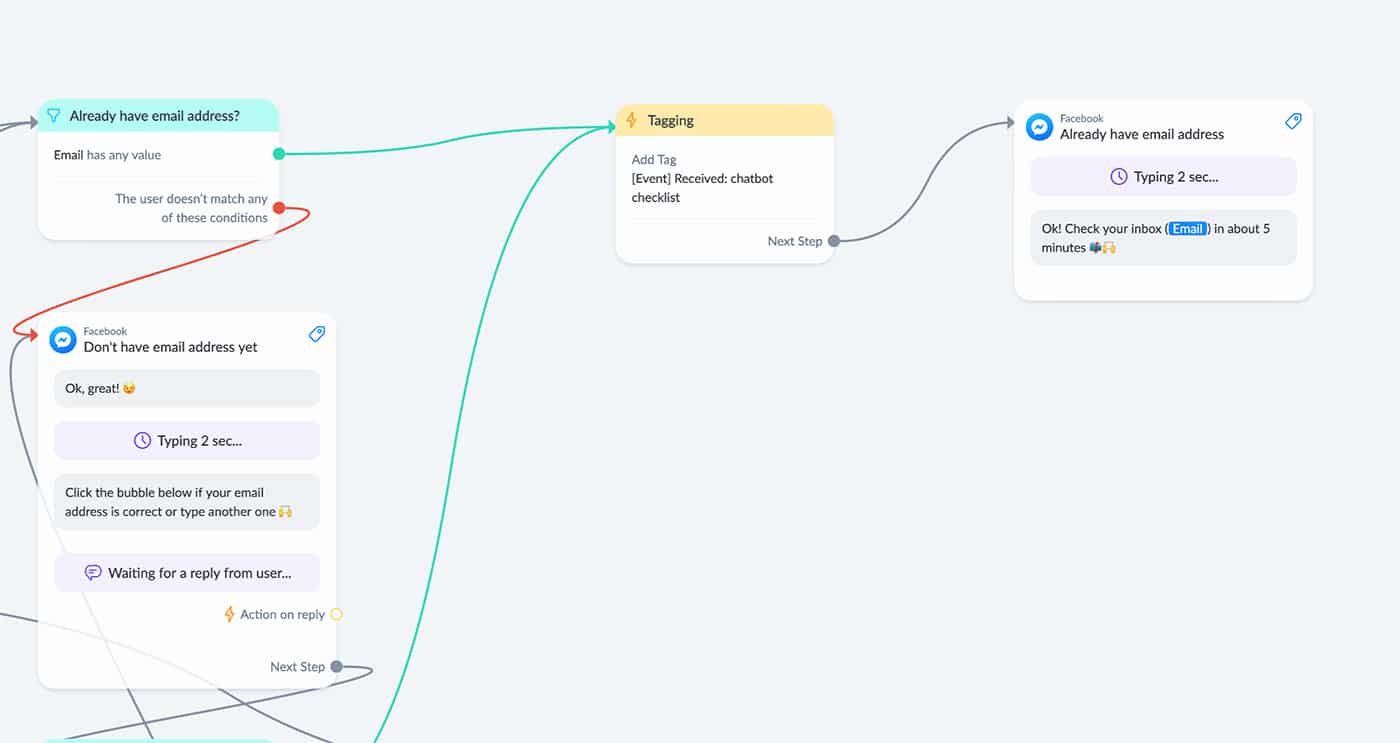
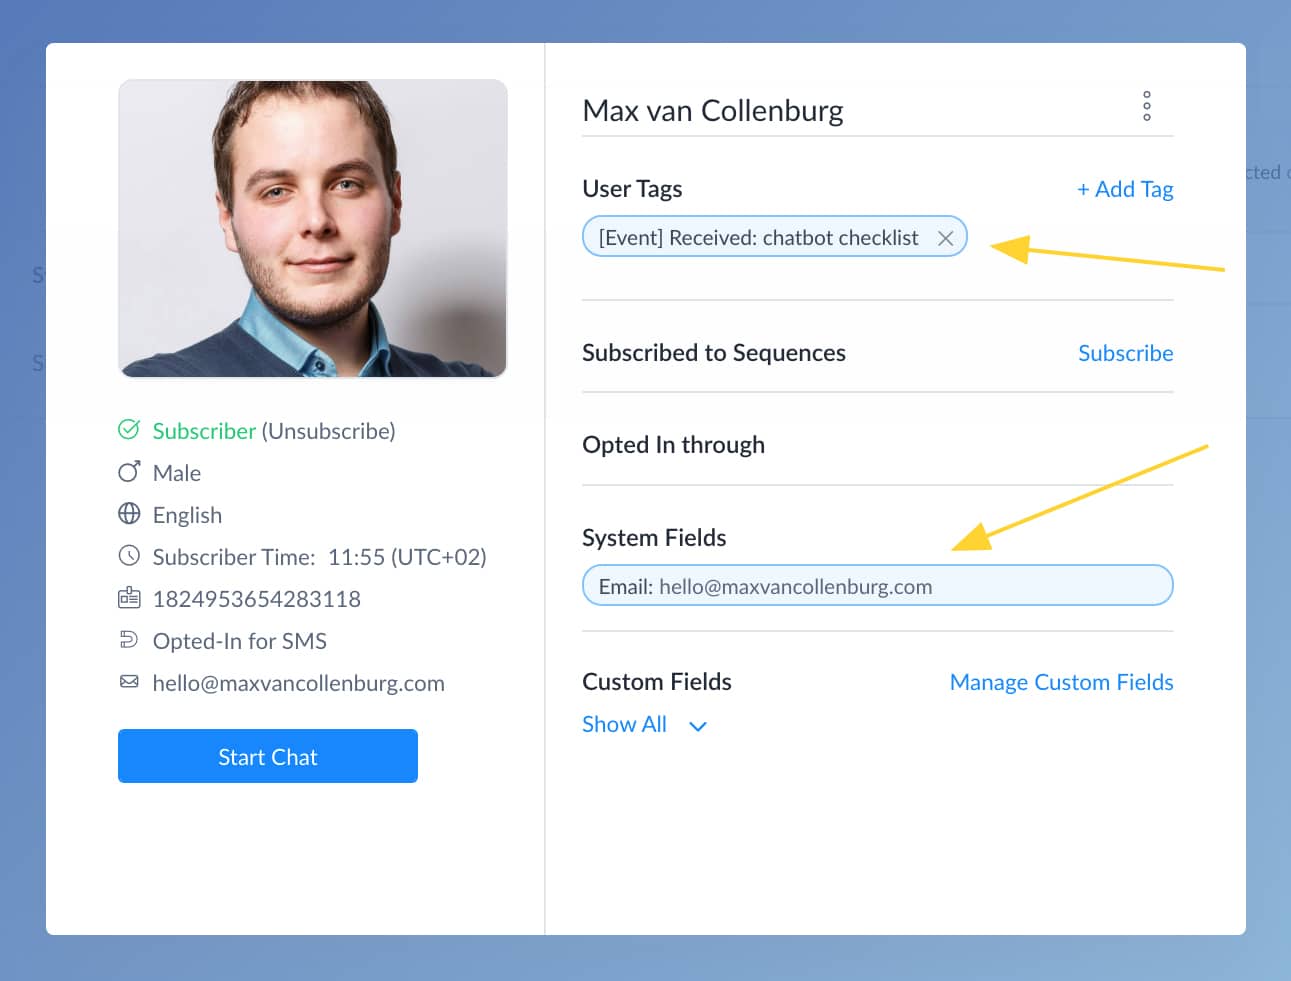
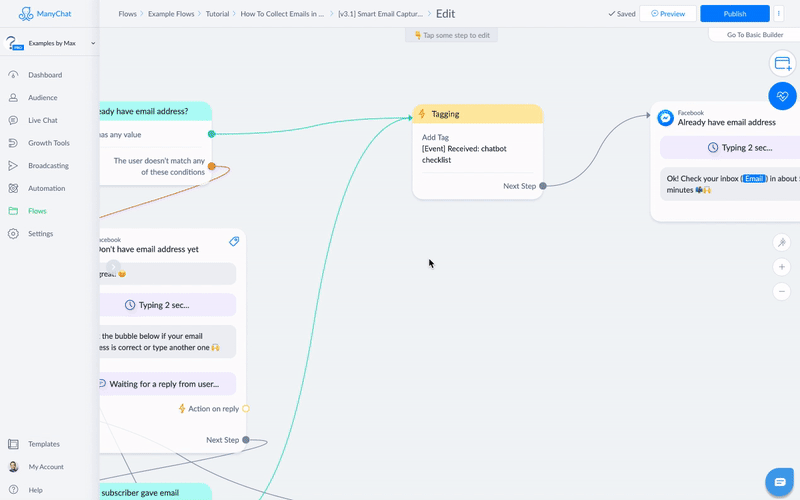
And after you’ve done all that, you tag that people received your checklist & you let them know when they can expect it in their inbox.
And then it’s time to test if you’ve set it up correctly 🙃
Preview the flow, go through all the steps, and go to your profile to see if the email address & tag were added.
Adding contacts to your Email Service Provider
After you’ve captured an email address in Facebook Messenger you need to add this email address to your Email Service Provider.
Depending on which one you’re using these steps might be slightly different.
But most tools work pretty similarly.
I’ll show you the exact steps for ActiveCampaign, but the process is very similar if you’re using another tool like Infusionsoft, Drip, ConvertKit or MailChimp.
To make the connection between ManyChat and ActiveCampaign we’re going to need a tool called Make.
(Make is free up to 1000 tasks)
It’s pretty similar to Zapier, in case you’re familiar with that, but it’s way more affordable.
With Make you can connect all kinds of tools without any programming knowledge.
Really cool stuff!
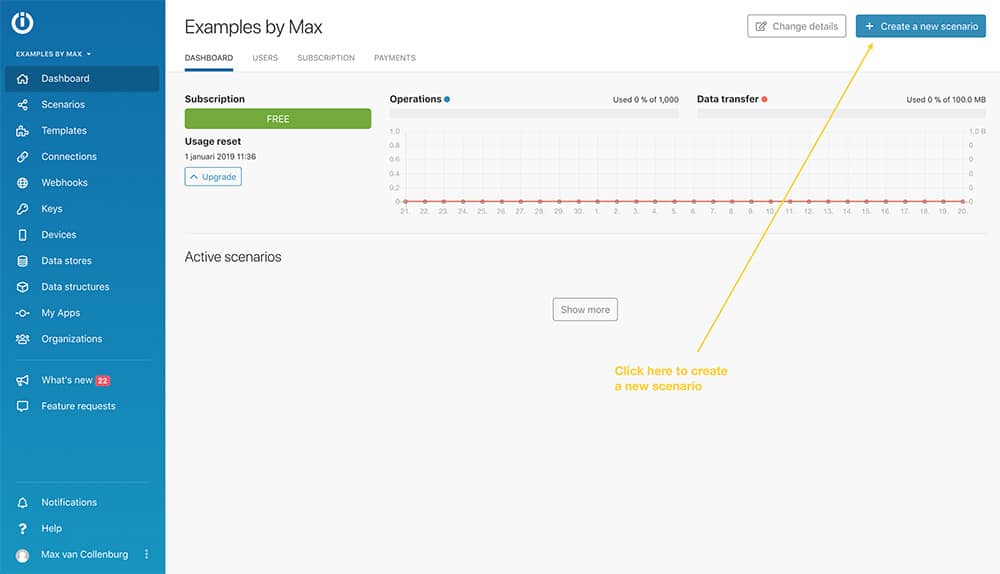
So the first thing we need to do is to create a new scenario.
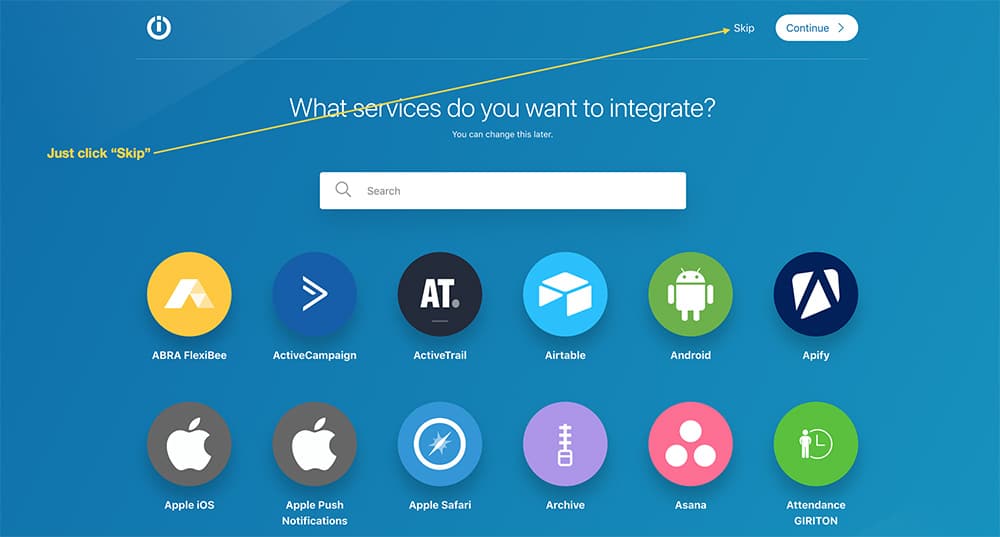
You’ll see the screen below, just click “Skip”.
The first step is going to be a webhook.
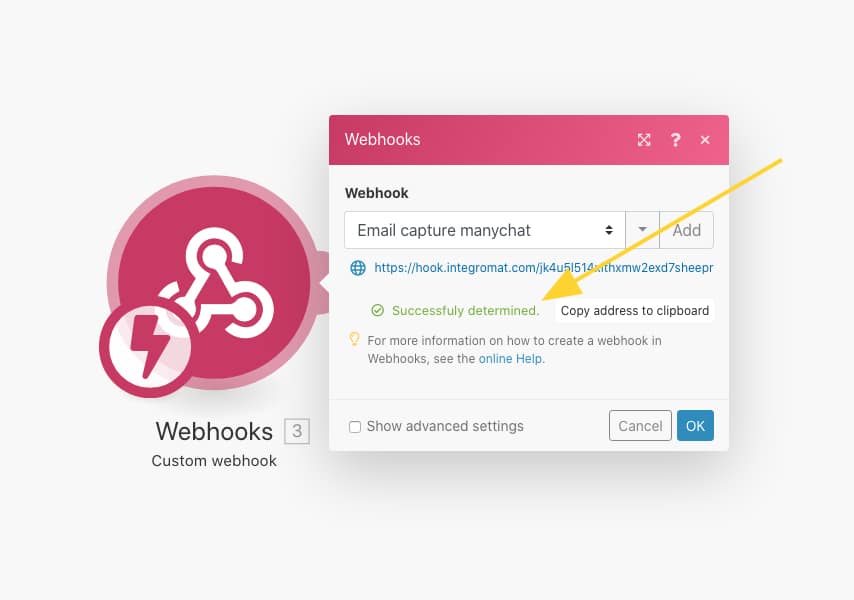
Search for “Webhooks”, click it, click “Custom webhook”, click “Add’, give it a name, click “Save” and copy the URL you see there.
We then go back to the flow in ManyChat and add an “External Request” action like I’m doing below.
You need to add this directly after the subscriber gave their email address.
It’s also possible to use the “Trigger Make” action, but I like the External Request better because it’s more flexible.
After you’ve done that, go back to Make.
If you previewed the external request you’ll see a little notification that says that the data structure was successfully determined.
This is important because this way Make can use all the data ManyChat passed on as variables.
If you don’t see it, click “Re-determine data structure” and try to preview the External request again.
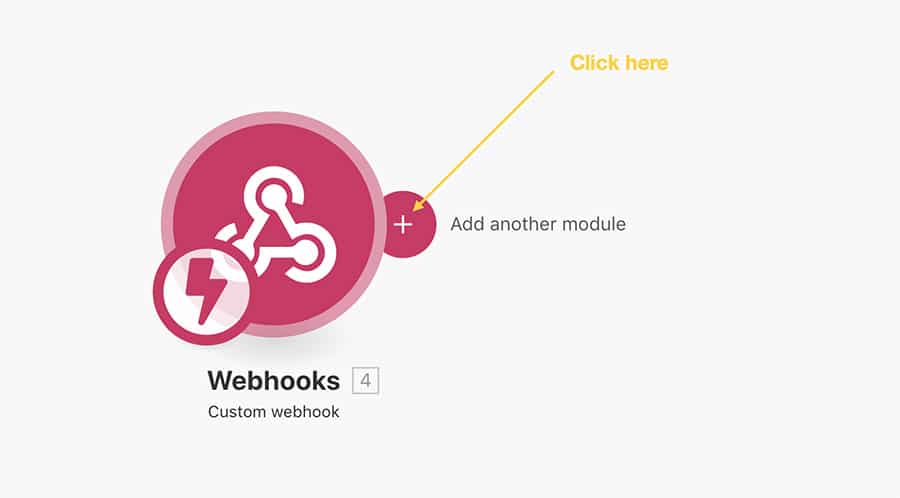
We’re then going to add another step to the scenario.
Click “Add another module”
Search for ActiveCampaign & click it.
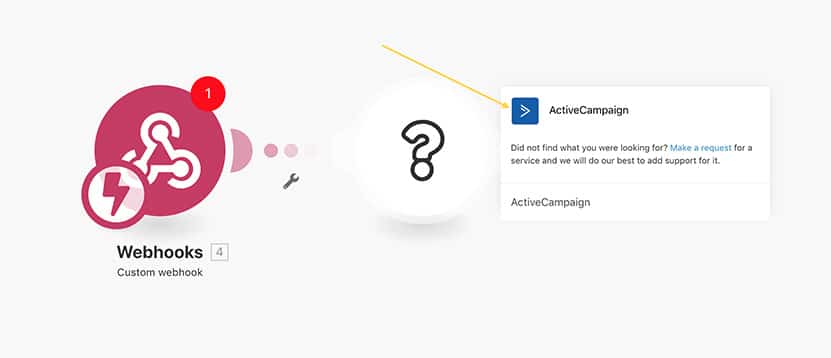
You’ll then see a long list of cool possibilities.
Forget about the rest for now and just click “Create/Update a contact”.
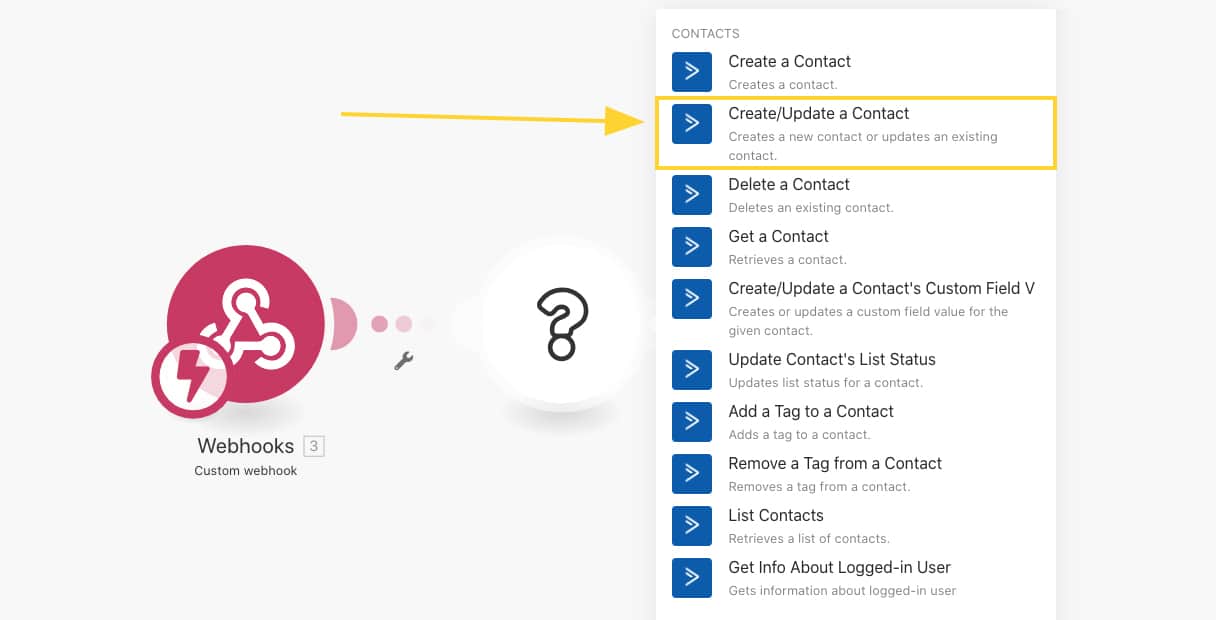
And then use the data from the webhook to fill in the fields.
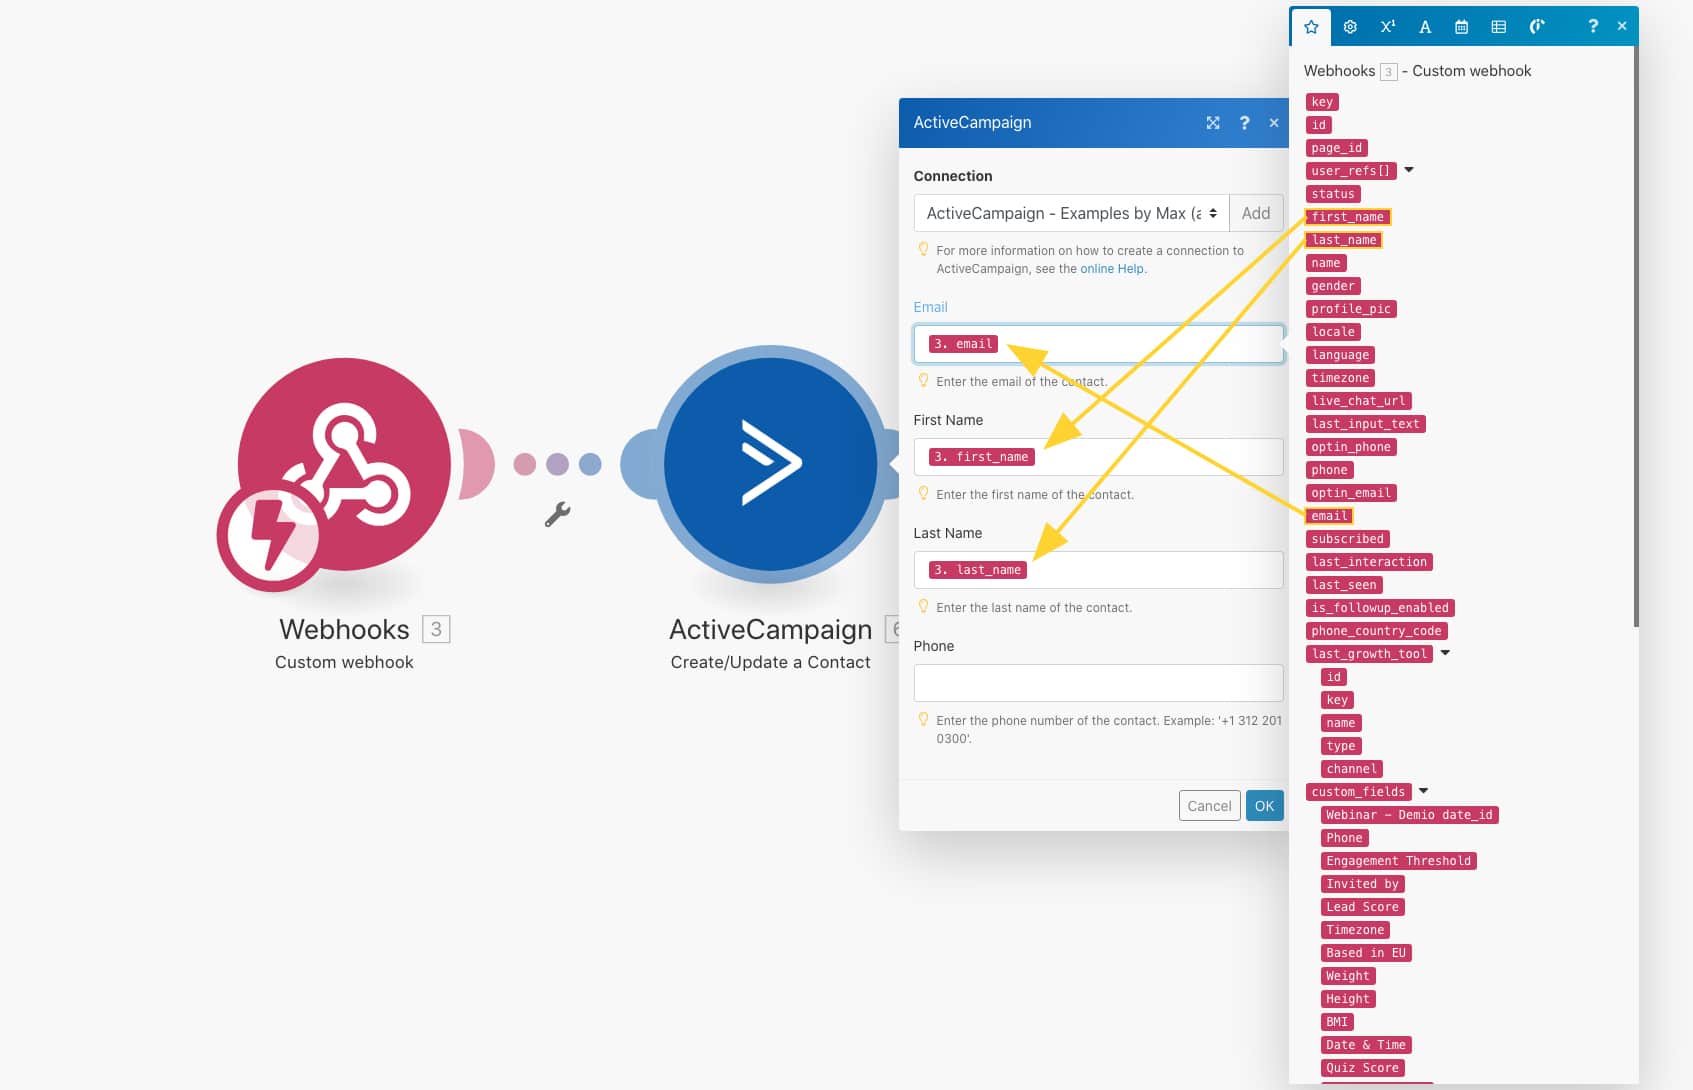
Then, create another module to subscribe this new contact to a list.
Use the contact ID of the previous module, select your list & set the status to “active”.
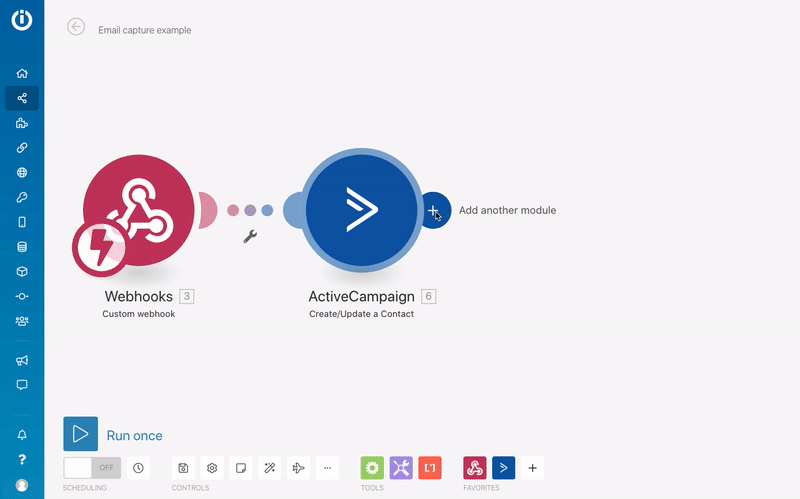
That’s it!
Click the save button at the bottom.
(I forget this so often, lol)

And then click “Run once” & preview the flow in Messenger to test if everything is working.
Delivering your lead magnet
One step left.
You now know how to capture an email address in Messenger and how to add it to ActiveCampaign.
But how do you send the lead magnet your promised?
Simple.
We’ve to create a simple automation to deliver it 🙃
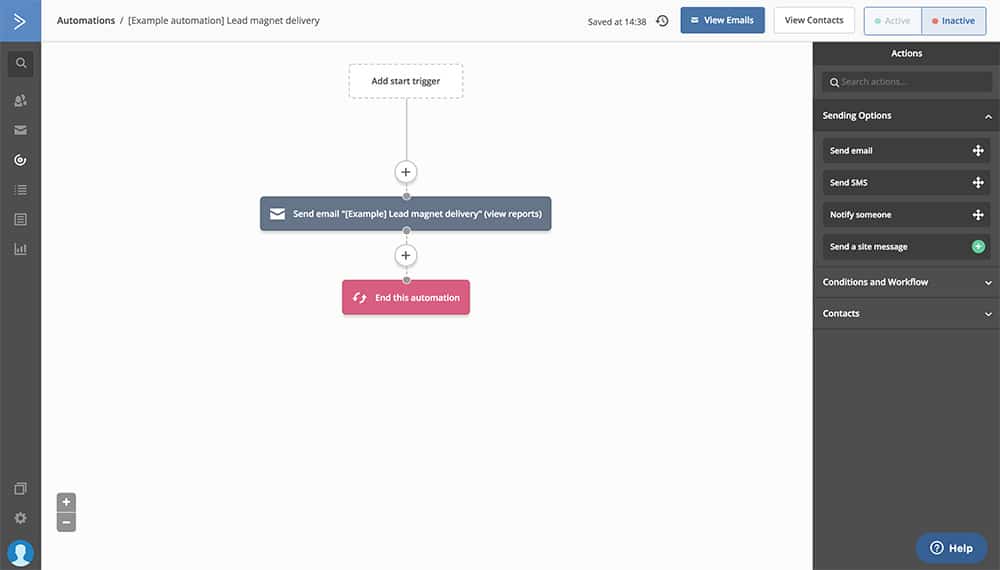
It’s sending the email below and then ends the automation.
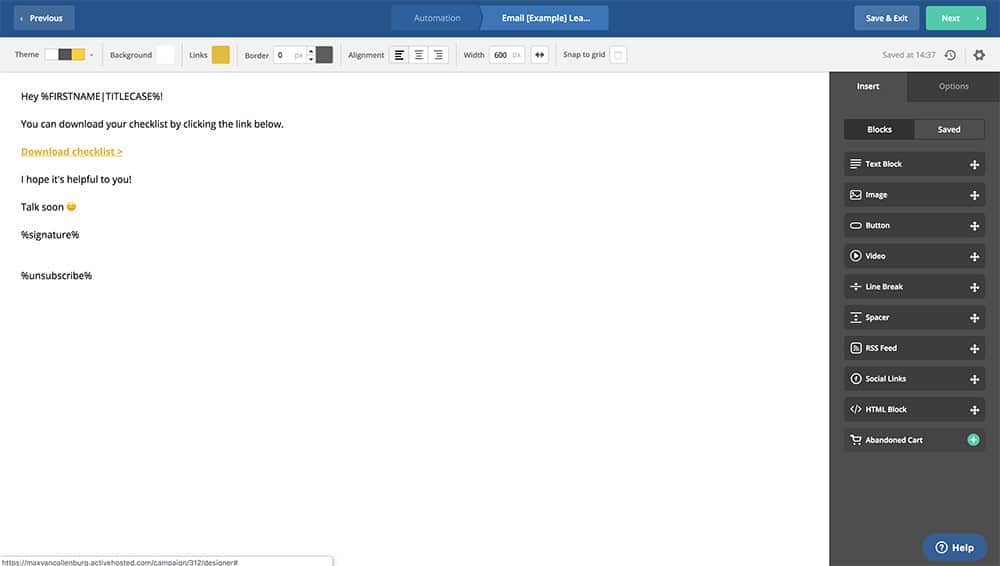
Easy hu? 😋
We’re almost done!
The only thing left is that we have to add someone automatically to this automation.
To do that we go back to Make and add another ActiveCampaign module.
This time we’re using “Manage contact in the automation”.
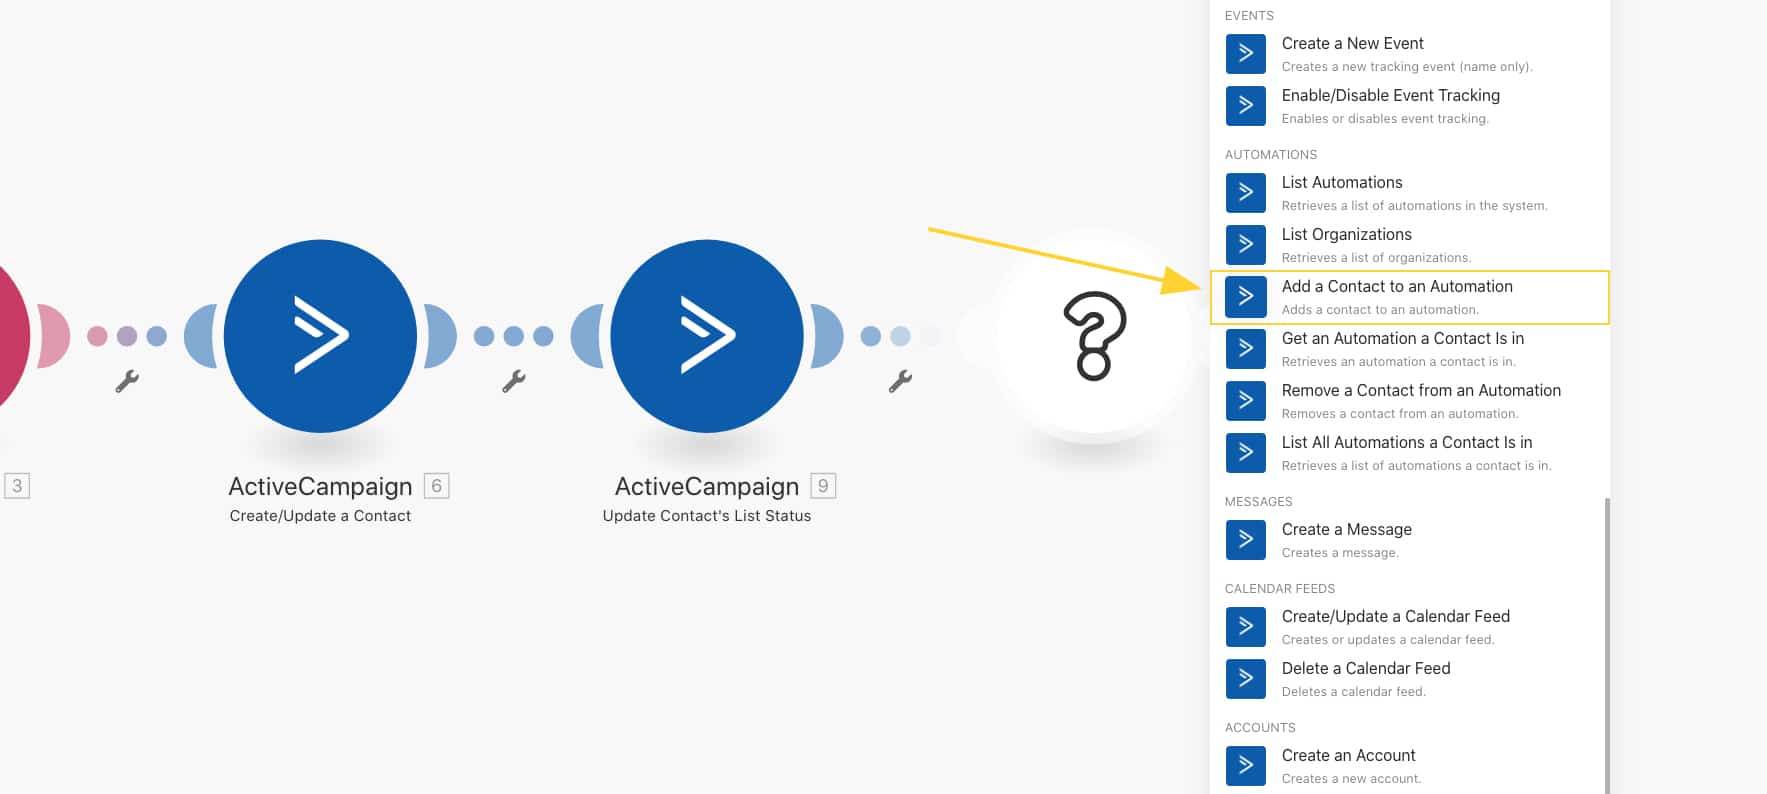
And then we’re using the email address from the webhook module again, select the right automation and set it to “add”.
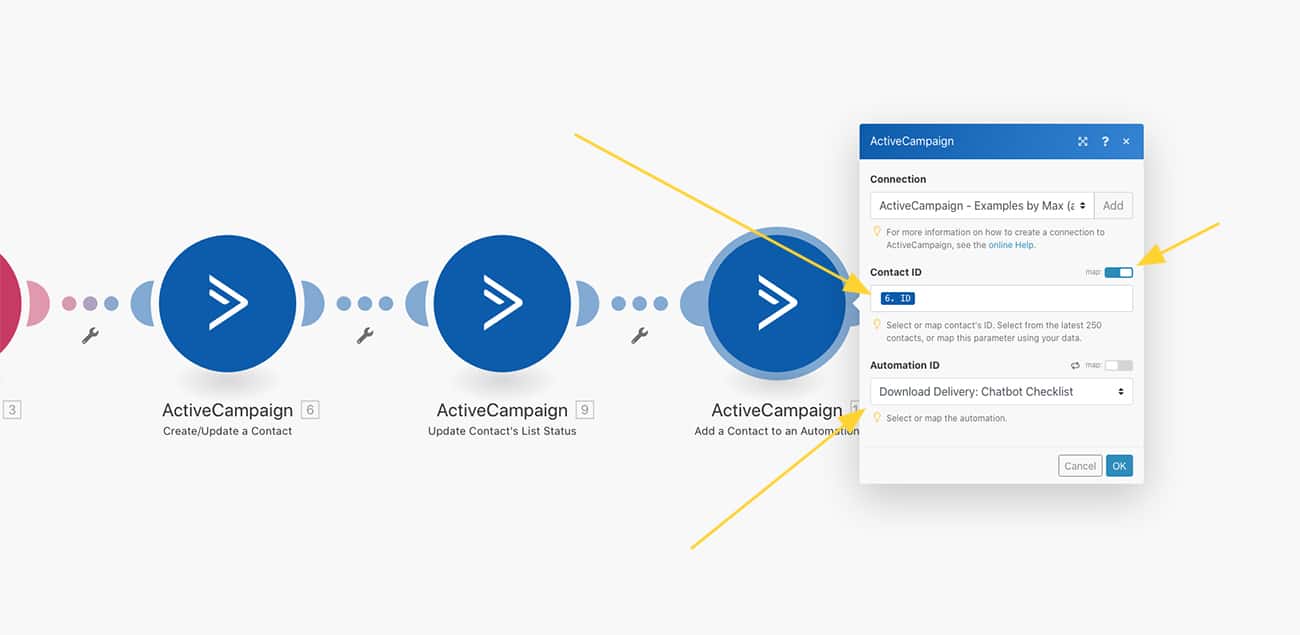
Done!
Cool right?
This way you can grow your email list superduper easy by simply asking your subscribers for their email address directly inside Messenger.
It’s very user-friendly and because of that highly effective.
Any questions? Ask them below 🙃
Want the exact flow I’m using to capture 80,46% of my subscriber’s email addresses?
Get a plug & play email capture template for ManyChat.
Hi Max,
Thank you so much for the step by step instructions on how to add a custom field.
Can you help with the process when using SendPulse for email?
Thank you!
Lea <
Pet Pro/Entrepreneur
Hey Lea! Thanks, glad you like it. I don’t have any experience with SendPulse, sorry.
Hello Max, big thanks for your detailed manual
You’re welcome! 🤗
Hi Max, I’m so glad I found you! You deliver tons of advice I was looking for. However, I found it a bit difficult to use Clickfunnels Actionetics in this scenario. Is there a way to send all the useful information (like custom fields: gender, tags, and so on)? Thanks for the response!
I’ve never used Clickfunnels, so I can’t help you with that. Sorry.
in your example, you have the email address pre-filled in the button, so the user just has to click it to confirm it. How did you get the email address to pre-populate for that field?
Hey Simon! When you set the Reply Type of the user input to Email, Facebook will automatically pre-populate the quick reply with the email address that’s associated with that person’s account.
Great tutorial. I had some issues integrating it with Get Response but its all sorted out now!
Kudos Brother.
Happy to hear you got it to work! 😄
Hey Max,
great content thank you very much.
I have a question, I used a part of you E-mail Opt In flow.
If the consumer types in a wrong email address like max123.de my flow tells him to check the wrong email and correct it.
Unfortunately, the E-mail address saved into the custom field will be the wrong first one an not the corrected second one.
Would be great if you could help me out.
Cheers,
Dari
Hey Dari! That’s weird!
Maybe try to insert an action that manually clears the email custom field after a subscriber gave one that’s invalid.
Or you could try to use the new email system field because that field can only store valid email formats.
Hope that helps!
how to collect email address for account free?
I’m not sure what you mean?
Hi Max, I am using the free version of Manychat. Can I use your technique on the free version or only when you are subscribed to Manychat pro?
Hi Suzanne! Most techniques I explain can only be used on the pro plan. The free plan is pretty limiting unfortunately.